Having thoroughly cleaned your airbrush, it’s about time you started using it. In this penultimate tutorial we look at the variables that must be considered when achieving a spray pattern: paint mix (viscosity), air flow (pressure) and distance.
Sponsored by
The airbrush is clean, the paints and parts are ready... now it’s time to get down to business and add colour to your model. Achieving any kind of spray pattern is a matter of getting the paint from the airbrush and onto the subject, which is not as straightforward as it sounds. There are three principles you must balance to accomplish this task, which we will address in turn: air flow (pressure), paint viscosity (to achieve atomisation within/outside the airbrush, dependent on whether it is an internal or external mix device) and the distance between airbrush and model.
Thick as mud or thin as water
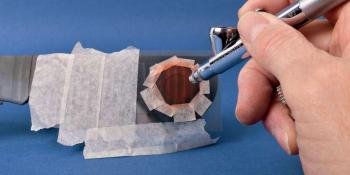
If the paint you have loaded into your airbrush is overly thick, then it will probably not flow – even if you turn up the air pressure on your compressor. If the undiluted paint does eventually flow, then it will probably not be even and will splutter out of the nozzle, forming a spattered mess on the surface you are painting. This seemingly cratered e…